
Here is my angel BEFORE editing. This is raw/naked SOOC.

Looks pretty good SOOC but I wanted some PIZAZZ!
So here are the intricate steps I took to get it to it's end result:
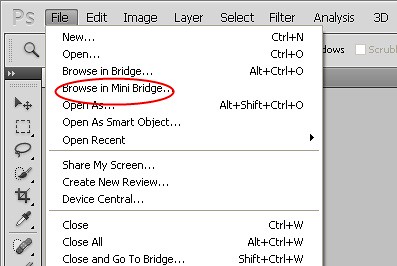
Okay, for those of you who have CS5 you may or may not know about the "Mini Bridge" function. You go to File-Browse in Mini Bridge and a small little window pops up for you to find where you want to take photos from. I take mine straight off my SD card (which is stuck in the appropriate slot in my tower) So for ME it's "My Computer-Local Disk F-DSCM-DSCM1-and that leads me to all the content on my memory card in one convenient little window! I scroll through and find the photo I want to work on and that looks like this:
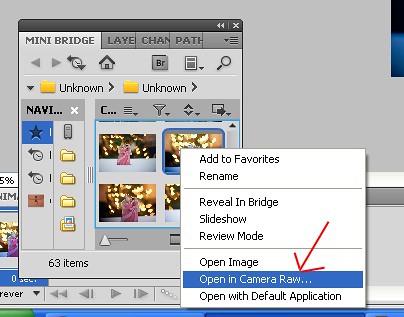
And I simple RIGHT CLICK the photo and hit "Open in Camera Raw"...Camera Raw is an AWESOME feature on CS5. It allows you to tweak the white balance, fill light, exposure, blacks, contrast, clarity ..etc! Kinda like Lightroom's features! Anyways..Mandy over at A Sorta Fairytale blog shared a tutorial on correcting white balance in CS a while back..and it was SOO helpful for me and huge thanks goes out to her for that~! Okay back to the point..I open my image in Camera Raw and immediately do an "Auto White Balance Correct" shown here:
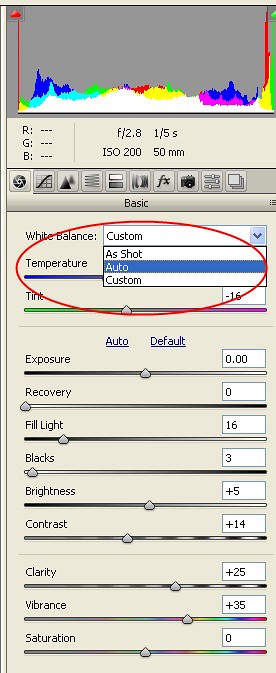
It's in the drop down window to the right of your image. After I do that I adjust exposure and fill light..then hop over a couple tabs and up the sharpness and play with the noise reduction stuff that's available in Camera Raw!
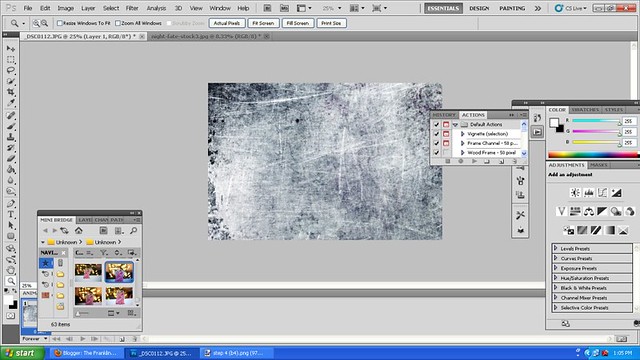
Okay so now that we've got our white balance adjusted and so on we hit "Open" at the bottom of the Camera Raw editor and it opens up our image in Photoshop. Now I want to add a texture...so if you have some awesome textures already and know how to to open them .. do so now! If not, I snagged me some goodies from DeviantART.com! They have all kinds of free goodies like actions and textures available if you search their archives. One of my FAVORITE texture sets are from "Night Fate"..they also make actions and it's hit or miss but when it's free, it doesnt matter :) So now you open your texture in Photoshop you select the texture using your marquee tool (or I do anyways) and hit Edit-Copy then open your image and hit Edit-Paste. Boom, your texture is placed right on top of your image covering it up like so:
Don't Panic! We're almost done :) Next we have to decide which "blend mode" is best for this texture on the photo. In the drop-down menu in your layers palette you'll see this:
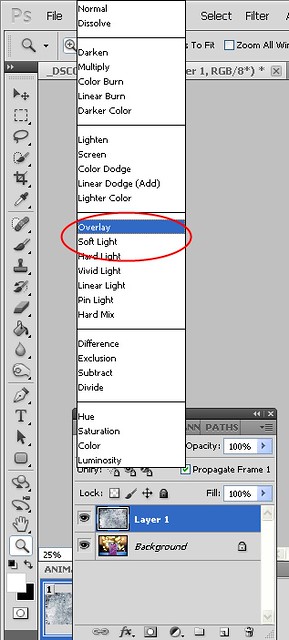
My favorite "blend mode" to use are either overlay or soft light...although I have 'overlay' highlighted I used soft light with the photo since overlay seems a bit harsh..and then it blends your texture into your image and it looks like this:

As you can see I put the rest of the directions on the screen shot. After blending your texture..you'll probably want to remove some of the texture off of your subject (in my case, the angel) so I selected the eraser tool and set the eraser opacity to 100% and erased all the texture off the angel. I then lowered the opacity of the overall texture so that it was a little more softer..and as you can see from the image that was my finished result.
I hope that helped anyone who was wondering or wanted to know how to do this! As far as the "heart" bokeh there are TONS of tutorials out there as to how you can achieve that. I used cardstock paper out of my scrapbooking paper tablet and laid my 50mm lens "face down" on the paper and traced around it. Cut out a circle to fit onto my lens and then drew a heart in the center. Size is key..too big and you won't get a shape..too small and you can't see through it enough to focus on anything. So you have to experiment with the size of the shape to get the right one for your lens and camera! Good luck friends and hope you enjoyed!!
Oh yeah, this is my Before and After for the Pixel Perfect blog today..Go Here to see more before and afters!:

6 Lovely Reader(s) Said:
Thanks for the tut. Into Evernote to give it a try later when things are a little quieter around the house.
Thanks for sharing yours steps Natalie!
Thanks so much for sharing - I learned a few new things.
Nice tutorial. :)
Merry Christmas!
Thanks for visiting! I am excited to get back here and use that tutorial once the hubby installs Cs5. :)
Merry Christmas!
Hi there...just passing through. I had to take a looksee at the "other" Franklins. =)
I just love using texture and this is a great tutorial. Thanks for sharing.
Post a Comment