
So to get started you need a photo editing software, I have photoshop elements but you can use the Picasa editor from Google (which is free) or maybe download Paint.NET which is also free. You will need to start out with a "blank" file choosing your dimensions according to the maximum allowance of your blog (which you can find in the Design>Edit HTML>under "width". (The easiest way is to hit Ctrl+F and type in "header" and scroll until you find the width:###px) That will be the maximum width your header can be-the height totally depends on you.
Lets say for tutorial's sake that your header is 650px wide and you wanted the height to be oh...350 px, you would put in those dimensions and viola! A new blank document appears (if you have selected "white" under the color when choosing new document, if you had "transparent" selected you will see a bunch of grey and white squares.)
Now that you have a blank canvas do whatever your little heart desires in that square, whether it be adding photos in frames or downloading free stuff from scrapbooking sites or custom shapes and whatnot from the toolbar itself. Go crazy and make it as wild--or mild--as you want! Once finished create a new blank document and repeat (with a different design of course, after all you are making a slide show which means rotating between different headers so that you don't have just one.)
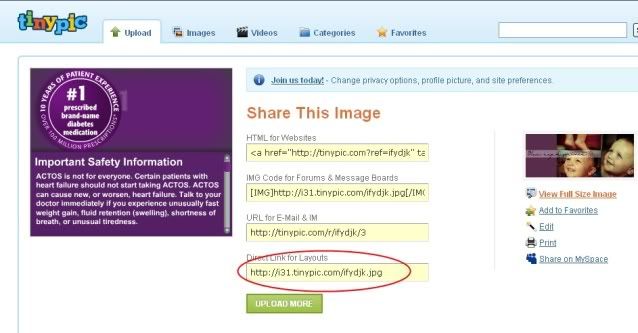
Once you've completed 5, or 6, or maybe more or less, save all the images as .jpg to your computer. The next steps are easy peasy! You will go to a photo hosting website (such as tinypic or photobucket) and upload each of your "banners" one at a time. After each is successfully uploaded, grab the DIRECT URL provided and paste it into "notepad" or "word" for the time being. **Note:When you upload to a photo hosting site, usually there are pre-selected dimensions the uploader is set to "size" size the photos to. The easiest route for me was to upload to tinypic with the "default" size selected from the drop-down menu.
Next you will proceed to the htmlbasix website...which is a code generating website that made my life miraculously easy...You will select "Automatically Refresh Page", indicate how often you want your photos to refresh, and select "same page" (top). Then in the two text boxes you will type in the dimensions of your photos (which we determined in photoshop or your choice editor) and finally paste the Direct Link of up to 10 images in each section and at the bottom you'll hit "generate".

A new window will open up with your newly generated html code for your header..see? Easy as PIE! Now you'll got back to your blogger, go to Design>Page Elements and do you see up at the top where it says "blog name (header)"? Directly under that you will see other boxes where it says "Add a Gadget". If you do not see this option you will need to do the following: Go to Edit HTML, and search for this:

and right under it you'll see something that says "Showaddelement=no" and you will change =no to =yes.
Now got back to your page elements and click "Add a Gadget" and select "Html/Javascript". Paste your generated code in the text field and hit "save" and preview your blog. Now if you old header is still there you will probably want to remove it completely..because you can't get but without at least having a title (unless you want one). But if you want the crisp, clean look of just a slideshow then you will have to tweak your code a little more.
Go back into your Edit Html from the design area. Look for "header1" in your html script and under that you will see something that says Locked=True and you need to change the word "true" into "false" and save. Now go back to your Page Elements, hit the "Edit" in the lower right hand corner of your header box and when that little window pops up you should now see the "remove" button in the lower lefthand side, clicking that will remove the header completely from your blog, leaving only your new, totally awesome slideshow!
0 Lovely Reader(s) Said:
Post a Comment